Address
304 North Cardinal St.
Dorchester Center, MA 02124
Work Hours
Monday to Friday: 7AM - 7PM
Weekend: 10AM - 5PM
Address
304 North Cardinal St.
Dorchester Center, MA 02124
Work Hours
Monday to Friday: 7AM - 7PM
Weekend: 10AM - 5PM
Your essential source on Unity and web development
Your essential source on Unity and web development
In Unity, a custom editor empowers us to modify the behavior of the editor for a MonoBehaviour or ScriptableObject. This allows us to customize the inspector by adding new information or completely transforming it.
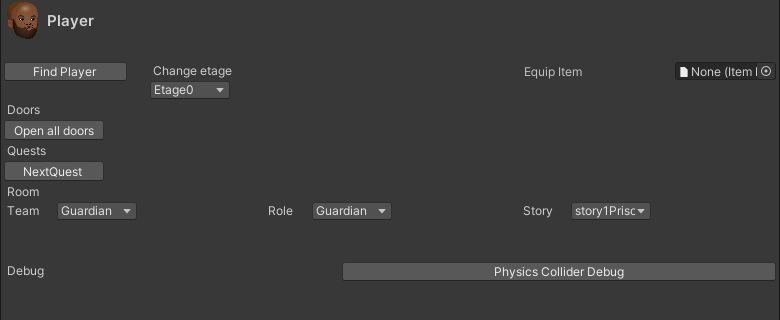 Custom inspector in one of my game (without style :p)
Table of contents
Our editor should be inherited from UnityEditor.Editor and have the class attribute “CustomEditor” with the class type as parameter. Don’t forget to create this editor in an Editor folder
using UnityEditor;

[CustomEditor(typeof(Player))]
public class PlayerEditor : Editor
{

}
To make the custom editor apply to all child classes, add “true” as the second parameter in the CustomEditor attribute.
[CustomEditor(typeof(Player), true)]
To modify the inspector, you must override the “OnInspectorGUI” method. If you only want to add fields after the default inspector display, you can inherit from the parent function with “base.OnInspectorGUI();” or simply call the “DrawDefaultInspector” method.
using UnityEditor;

[CustomEditor(typeof(Player))]
public class PlayerEditor : Editor
{
    public override void OnInspectorGUI()
    {
        base.OnInspectorGUI();
        // DrawDefaultInspector();
    }
}
Let’s take an example to make it more concrete. Our goal is to create a button in the Player’s inspector that teleports the player to the spawn point.
public override void OnInspectorGUI()
{
base.OnInspectorGUI();
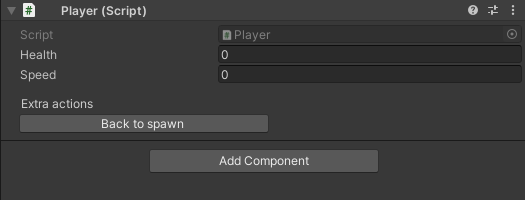
GUILayout.Label("Extra actions");
if (GUILayout.Button("Back to spawn"))
{
// action when the button is clicked
BackToSpawn();
}
}
private void BackToSpawn()
{
}
Check GUILayout.Button documentation for a complete customization.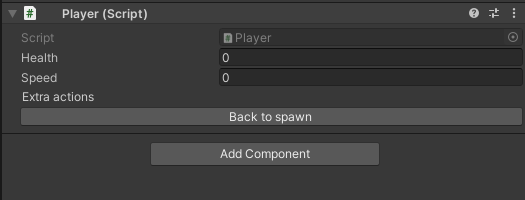
To retrieve our object attached to our editor, we can use the “target” property and then apply a cast (if desired).
private void BackToSpawn()
{
    var player = target as Player;

    // In a real scenario, we will call an external service to get the position of the spawn area.
    player.transform.position = Vector3.zero;
}
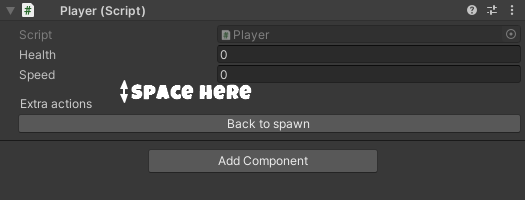
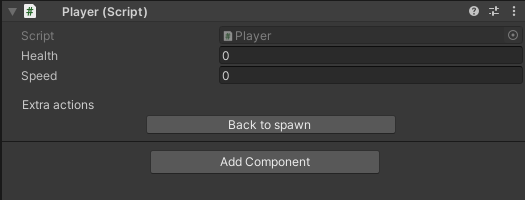
To add space, you can use the “GUILayout.Space” method.
GUILayout.Space(10f);
Each element created by GUILayout has an optional parameter (GUILayoutOption array) in its method to modify its layout. For example, to prevent our button from scaling horizontally, we give him a max-width with GUILayout.MaxWidth(250).
if (GUILayout.Button("Back to spawn", new GUILayoutOption[] { GUILayout.MaxWidth(250) }))
{
    BackToSpawn();
}
To center an element, put it in a horizontal container (BeginHorizontal -> EndHorizontal) and add flexible space before and after it using GUILayout.FlexibleSpace. This will center the element.
GUILayout.BeginHorizontal();
GUILayout.FlexibleSpace();
if (GUILayout.Button("Back to spawn", new GUILayoutOption[] { GUILayout.MaxWidth(250) }))
{
    BackToSpawn();
}
GUILayout.FlexibleSpace();
GUILayout.EndHorizontal();
To customize the style, retrieve the default style of our element, such as a button: “new GUIStyle(GUI.skin.button);” Then modify the desired parameters.
var style = new GUIStyle(GUI.skin.button);
style.normal.textColor = Color.white;
style.fontStyle = FontStyle.Bold;
style.fontSize = 20;

if (GUILayout.Button("Back to spawn", style, new GUILayoutOption[] { GUILayout.MaxWidth(250) }))
{
    BackToSpawn();
}
Change the background color using the “GUI.backgroundColor” function. Remember to redefine the default value after changing it.
// store background color
var oldBackgroundColor = GUI.backgroundColor;

// change value
GUI.backgroundColor = new Color32(11, 232, 129, 255);

var style = new GUIStyle(GUI.skin.button);
style.normal.textColor = Color.white;
style.fontStyle = FontStyle.Bold;
style.fontSize = 20;

if (GUILayout.Button("Back to spawn", style, new GUILayoutOption[] { GUILayout.MaxWidth(250) }))
{
    BackToSpawn();
}

// put the initial value
GUI.backgroundColor = oldBackgroundColor;
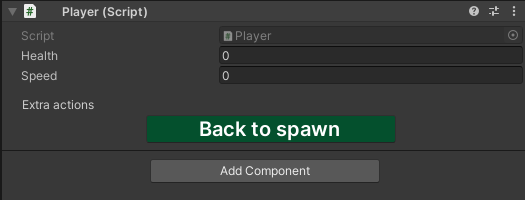
However, the associated color will not be identical to the specified value because, for each state (normal, active, hover, etc.), a style has a background, for example, “style.normal.background.”
During rendering, the background is retrieved, and the value of GUI.backgroundColor is associated with it. Since the normal state has a background that is not white, the rendered color appears darker.
To enable multi-editing, add the “CanEditMultipleObjects” attribute to your custom editor.
[CanEditMultipleObjects]
[CustomEditor(typeof(Player))]
public class PlayerEditor : Editor
{

}
However, to make our previous code work, we must make some changes. Instead of using “target” to reference, use “targets“.
private void BackToSpawn()
{
    var players = targets.Cast<Player>().ToList();

    foreach (var player in players)
    {
        // In a real scenario, we will call an external service to get the position of the spawn area.
        player.transform.position = Vector3.zero;
    }
}
This was just an introduction to the world of custom editors. Part 2 will be coming soon.