Address
304 North Cardinal St.
Dorchester Center, MA 02124
Work Hours
Monday to Friday: 7AM - 7PM
Weekend: 10AM - 5PM
We use cookies to ensure that we provide you with the best possible experience on our site.

Your essential source on Unity and web development

Your essential source on Unity and web development

In Unity, the “AddComponent” feature simplifies the process of enhancing GameObject functionality. With a simple click in the editor’s inspector, users can effortlessly append diverse components to their Unity objects.
Table of contents
The `AddComponent` function allows you to add a component to a GameObject dynamically.
private void Add()
{
  var rigidbody2d = gameObject.AddComponent<Rigidbody2D>();

  // return Component, you can cast it
  var rigidbody = gameObject.AddComponent(typeof(Rigidbody2D));
}
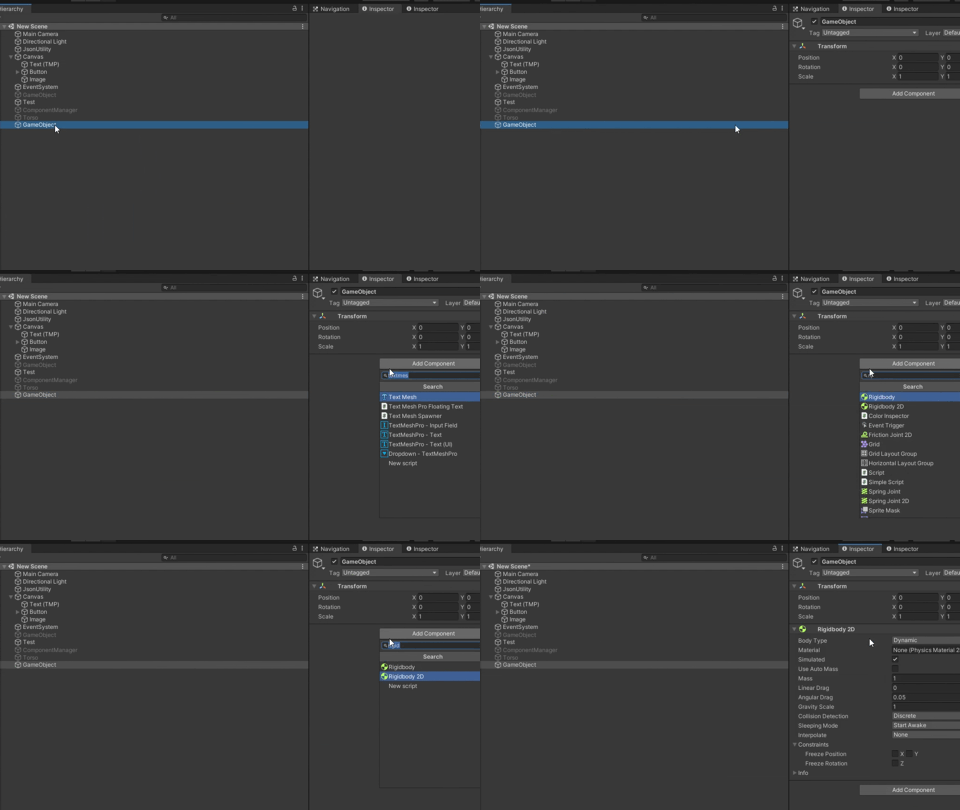
You can directly add a component to your GameObject in the Unity editor by following these steps:

Additionally, you can add your own script as a component. To do this, your script must inherit from the UnityEngine.Component class. In most cases, your scripts will inherit from the MonoBehaviour class, which itself inherits from Component:
using UnityEngine;

public class MyMonoBehaviour : MonoBehaviour
{

}

public class OtherMonoBehaviour : MonoBehaviour
{
    private void Awake()
    {
        gameObject.AddComponent<MyMonoBehaviour>();
    }
}
In an editor context, it may be useful to use Undo.AddComponent to implement an Undo action.
`AddComponent` does not natively allow passing parameters. It is preferable to create a separate function, e.g., “SetParameters,” to be called after creating the component.
using UnityEngine;

public class TorsoEquip : MonoBehaviour
{
    public int Defense { get; private set; }
    public int Resiliance { get; private set; }

    public void SetParameters(int defense, int resiliance)
    {
        Defense = defense;
        Resiliance = resiliance;
    }
}
private void AddComponentWithParamters()
{
	var torsoEqui = gameObject.AddComponent<TorsoEquip>();
	torsoEqui.SetParameters(20, 30);
}

To make code more reusable, it may be wiser to pass a configuration object instead of passing parameters one by one.
This configuration object can be a class, a struct or even a ScriptableObject, depending on your needs:
using UnityEngine;

public class TorsoEquip : MonoBehaviour
{
    public class EquipementStat
    {
        public int Defense { get; set; }
        public int Resiliance { get; set; }
    }

    public EquipementStat EquipementConfiguration { get; private set; }

    public void AddConfiguration(EquipementStat equipementConfiguration)
    {
        EquipementConfiguration = equipementConfiguration;

        // now you can call
        // EquipementConfiguration.Defense
        // Or EquipementConfiguration.Resiliance
    }
}
The RequireComponent attribute allows you to avoid setup errors when adding a script with this attribute. The required component will be added simultaneously, but note that this only works in the editor.
This attribute is used in “TextMeshProUGUI”, to add a RectTransform and CanvasRenderer at the same time.
 Source code TextMeshProUGUI
Let’s take an example: Suppose we always want our “Ball” class to have a Rigidbody2D:
using UnityEngine;

[RequireComponent(typeof(Rigidbody2D))]
public class Ball : MonoBehaviour
{
	private Rigidbody2D _rigidbody2D;

    private void Awake()
    {
        _rigidbody2D = GetComponent<Rigidbody2D>();
    }
}
To conclude embracing Unity’s “AddComponent” feature opens a gateway to seamless customization and dynamic GameObject enhancements.
Thank you for exploring this topic with me – happy coding!