Address
304 North Cardinal St.
Dorchester Center, MA 02124
Work Hours
Monday to Friday: 7AM - 7PM
Weekend: 10AM - 5PM
We use cookies to ensure that we provide you with the best possible experience on our site.

Your essential source on Unity and web development

Your essential source on Unity and web development

In the world of Unity, the Instantiate function is an indispensable tool, enabling us to copy a gameObject or other Unity object to our active scene.
The Instantiate method is static and emanates from the UnityEngine.Object class.
It can be envisaged as a duplication process; taking, as its primary parameter, a Unity object (a class inheriting from UnityEngine.Object), duplicating it, and then initializing it within your scene.
Table of contents
To instantiate or clone a gameObject, we dive into the code, utilizing the static “Instantiate” function.
This function returns the instantiated clone.
Let’s take into a simple example where we invoke a gameObject already present in our scene from a MonoBehaviour:
using UnityEngine;

public class InvokeBehaviour : MonoBehaviour
{
    public GameObject referenceGameObject;

    private void Start()
    {
        GameObject instance = Instantiate(referenceGameObject);
        // Actions with the instance
    }
}
Info: Since our class is a MonoBehaviour inheriting from Object, we can directly use the static method without the prefix.
We utilize the Inspector to set our gameObject by reference:
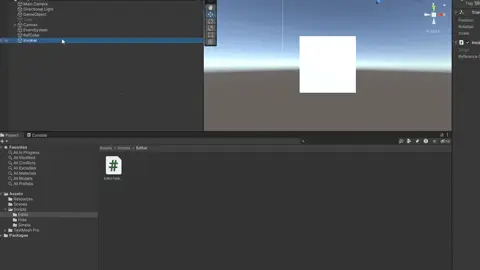
As seen in the image above, a copy of our gameObject has been created.
Note that, by default a “(Clone)” suffix is added.
You can directly modify a gameObject’s name via code using the ‘name‘ property.
There are several interesting things about the instantiate function, first the duplicated object is detached from the reference object.
Any modifications made to the duplicate do not reverberate back to the reference object.
Instantiate can be used outside a Unity class; its application is not restricted.
using UnityEngine;

public class Invoker
{
    public void Invoke(GameObject gameObject)
    {
        Object.Instantiate(gameObject);
    }
}
It’s crucial to underscore that Instantiate seamlessly operates with any element inheriting from Object.
When passing a MonoBehaviour as a parameter, the return element will also be a Monobehaviour, eliminating the need for casting or GetComponent.
using UnityEngine;

public class InvokeBehaviour : MonoBehaviour
{
    // Player is a MonoBehaviour
    public Player player;

    private void Start()
    {
        Player instance = Instantiate(player);
        // Actions with the instance
    }
}
Noteworthy is the addition, since Unity version 2022.3.11, of a new method specifically designed for GameObjects.
For further insights, refer to my dedicated article on InstantiateGameObjects.
It is possible to instantiate a gameObject as a child (adding a parent) using the Instantiate method, by associating a second parameter, a Transform, indicating the parent.
using UnityEngine;

public class InvokeBehaviour : MonoBehaviour
{
    public GameObject referenceGameObject;

    private void Start()
    {
        // The instance becomes the child of our MonoBehaviour
        GameObject instance = Instantiate(referenceGameObject, transform);
    }
}

We can add a third parameter after our transform; this is a boolean, “instantiateInWorldSpace”.
By default, its value is false.
When a parent is added, the position, scale, and rotation of the new object become relative to the parent.
To position your gameObject relative to the world space (including rotation and scale), you must indicate true.
GameObject instance = Instantiate(referenceGameObject, transform, true);
Example with positions:
| instantiateInWorldSpace | World Position reference GameObject | World Position parent | World Position duplicate | Local Position duplicate |
|---|---|---|---|---|
| false | Vector3(1, 0, 0) | Vector3(5, 5, 5) | Vector3(6, 5, 5) | Vector3(1, 0, 0) |
| true | Vector3(1, 0, 0) | Vector3(5, 5, 5) | Vector3(1, 0, 0) | Vector3(-4, -5, -5) |
It’s essential to note that when “instantiateInWorldSpace” is true, the duplicated object’s position in the world is identical to that of the reference object.
With false, it changes and becomes relative to that of the parent.
This also applies to scale and rotation.
You have the ability to directly modify the position and rotation of your instantiated GameObjects by associating additional parameters with the “Instantiate” function.
using UnityEngine;

public class InvokeBehaviour : MonoBehaviour
{
    public GameObject referenceGameObject;

    private void Start()
    {
        // Instantiate at Vector3(5, 0, 0) and without rotation
        GameObject instance = Instantiate(referenceGameObject, Vector3.right * 5f, Quaternion.identity);
    }
}
If you wish to avoid rotation, you can associate “Quaternion.identity” with the third parameter.
You can also associate a parent directly while specifying the position and rotation by adding a final, fourth parameter of type Transform.
Note that the added values remain in world coordinates even with a specified parent.
using UnityEngine;

public class InvokeBehaviour : MonoBehaviour
{
    public GameObject referenceGameObject;

    private void Start()
    {
        // Instantiate at Vector3(5, 0, 0) and without rotation
        GameObject instance = Instantiate(referenceGameObject, Vector3.right * 5f, Quaternion.identity, transform);
    }
}
What is a prefab?
The Unity Prefab system lets you transform a gameobject into a reusableAsset by creating, configuring and saving its components, property values and child GameObjects.
The Prefab Asset acts as a template from which you can spawn new instances in the scene.

On Unity, the prefabs are represented with a bluish color on the cube and the writing.
You can create a prefab by dragging and dropping a GameObject from your scene into a folder in your project.
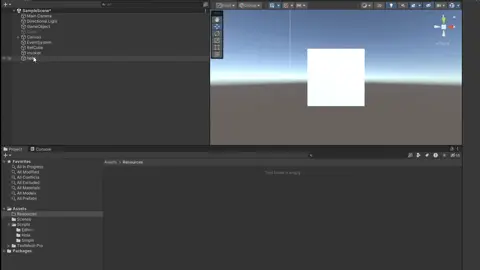
In Unity, to instantiate a prefab, we still rely on a C# script.
Instantiating our prefab remains the same as instantiating a GameObject already present in our scene.
We simply reference or load our prefab from our script and use the Instantiate function:
using UnityEngine;

public class InvokeBehaviour : MonoBehaviour
{
    public GameObject referencePrefab;

    private void Start()
    {
        GameObject instance = Instantiate(referencePrefab);
    }
}
During a standard instantiation of a prefab, you may have noticed that the link between the prefab and the duplicated object is broken.
 We’ve lost the bluish color
By using the “PrefabUtility.InstantiatePrefab” method, the connection between the prefab and the duplicated object is preserved.
This mirrors the behavior when you drag and drop your prefab onto the scene.
using UnityEngine;
using UnityEditor;

public class EditorHelper
{
    [MenuItem("Window/Instantiate")]
    private static void InstantiatePrefab()
    {
        // Load the hello prefab from Resources
        GameObject gameObject = Resources.Load<GameObject>("hello");
        Object instance = PrefabUtility.InstantiatePrefab(gameObject);
    }
}
Let’s revisit what a ScriptableObject is.
A ScriptableObject serves as a data container, capable not only of storing substantial amounts of data but also functioning as a middleman (facilitating events)…
It allows the storage of significant data quantities independently of class instances.
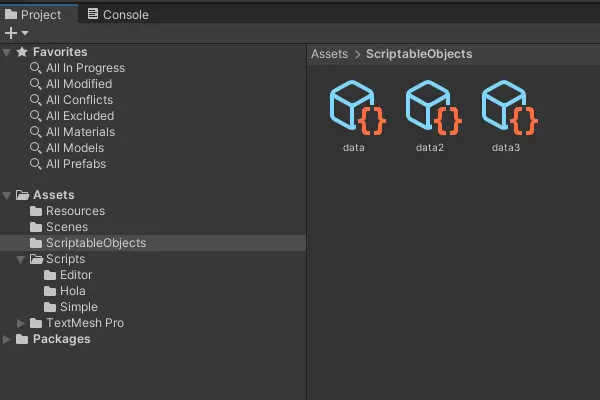
One of the primary use cases for ScriptableObjects is to reduce memory usage in your project by avoiding the duplication of values.
To instantiate (or in this case, duplicate) a ScriptableObject, the Instantiate method can be employed.
However, if you wish to create a blank ScriptableObject, “ScriptableObject.CreateInstance” can be utilized.
For usage in the editor environment, it needs to be coupled with “AssetDatabase.CreateAsset” to create the asset in your project.
using UnityEngine;
using UnityEditor;

public class EditorHelper
{
    [MenuItem("Window/Scriptable")]
    private static void CreateScriptable()
    {
        // Data is a ScriptableObject
        Data data = ScriptableObject.CreateInstance<Data>();

        AssetDatabase.CreateAsset(data, "Assets/data.asset");
        // Writes all unsaved asset changes to disk.
        AssetDatabase.SaveAssets();
    }
}
This method can also be employed in real-time.
However, personally, I find its use quite situational.
While the ability to modify data directly in the inspector may be appealing, in many cases, a C# class or structure allows you to achieve the same result with better performance.
In a multi-scene context, where you have an active (main) scene along with one or more additive scenes, calling the “Instantiate” method will always result in the cloned gameObject appearing in the active scene, regardless of the original scene from which the call occurs.
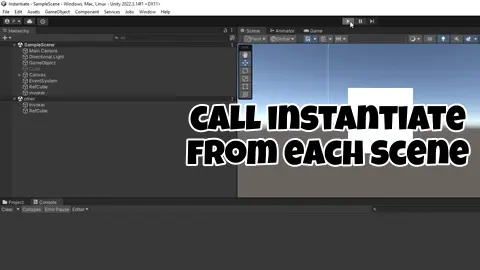
You can define your active scene through the editor by right-clicking on your scene in the scene hierarchy and selecting “Set Active Scene.“
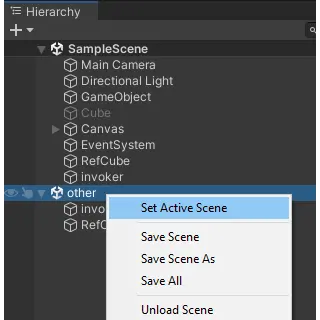
Real-time activation is also possible using the “SceneManager.SetActiveScene” method.
Moreover, it’s feasible to move a gameObject from one scene to another through the static method “SceneManager.MoveGameObjectToScene.“
using UnityEngine;
using UnityEngine.SceneManagement;

public class InvokeBehaviour : MonoBehaviour
{
    public void MoveScene()
    {
        SceneManager.MoveGameObjectToScene(gameObject, SceneManager.GetSceneByName("scene1"));
    }
}
Furthermore, starting from Unity 2022.3.11, the method “SceneManager.MoveGameObjectsToScene” allows the movement of multiple gameObjects using their instanceIds.
To instantiate an empty object, there’s no need for the “Instantiate” function.
Instead, you can create an instance of the GameObject class in a script.
You can directly associate a name using the constructor’s first parameter.
To add components during the gameObject creation:
private void EmptyGameObject()
{
    // Empty gameObject with defaultName
    var gameObjectWithoutName = new GameObject();

    // Empty GameObject with custom name
    var gameObjectWithName = new GameObject("Name of GameObject");

    // Empty GameObject created with an array type of components
    var gameObjectWithComponent = new GameObject("Name of GameObject", new System.Type[] { typeof(BoxCollider2D), typeof(Rigidbody2D) });

    // Alternative, pass type component parameters one by one
    var alternativeGameObjectWithComponent = new GameObject("Name of GameObject", typeof(BoxCollider2D), typeof(Rigidbody2D));
}
It is also possible to add an empty GameObject via the editor: right-click on the scene hierarchy and click “Create Empty.”
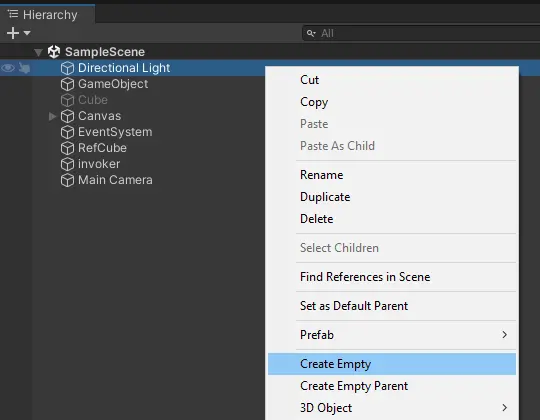
You can also use the shortcut “Ctrl+Shift+N.” To make the gameObject a child of the currently selected object, use “Alt+Shift+N.“
To instantiate a cube or any other primitive, we use the static method GameObject.CreatePrimitive.
As the first argument, we pass the PrimitiveType we desire.
Unity offers six types:
private void CreatePrimitive()
{
    GameObject cube = GameObject.CreatePrimitive(PrimitiveType.Cube);
}
An important note from the documentation:
CreatePrimitive may fail at runtime if your project does not reference the following components: MeshFilter, MeshRenderer, and BoxCollider or SphereCollider at runtime.
The recommended way to avoid this crash is to declare private properties of these types. The stripping system will recognize their use, including them in the build, so it will not delete these components.
You can also create a cube directly in the Unity editor: right-click on the scene hierarchy -> “3D Object” -> “Cube.“
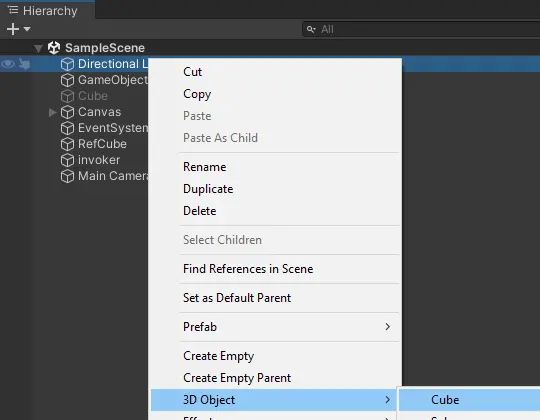
If you want to instantiate and apply parameters, as with AddComponent, it’s not possible to do it directly.
It’s preferable to create a separate function, for example, ‘SetParameters,’ to call after creating the component.
using UnityEngine;

public class TorsoEquip : MonoBehaviour
{
    public int Defense { get; private set; }
    public int Resilience { get; private set; }

    public void SetParameters(int defense, int resilience)
    {
        Defense = defense;
        Resilience = resilience;
    }
}

using UnityEngine;

public class InvokeBehaviour : MonoBehaviour
{
    public TorsoEquip prefabTorsoEquip;

    private void InvokeWithParameters()
    {
        var torsoEquip = Instantiate(prefabTorsoEquip);
        torsoEquip.SetParameters(20, 30);
    }
To make the code more reusable, it might be wiser to pass a configuration object instead of passing parameters one by one.
This configuration object can be a class, a structure, or even a ScriptableObject, depending on your needs:
using UnityEngine;

public class TorsoEquip : MonoBehaviour
{
    public class EquipmentStat
    {
        public int Defense { get; set; }
        public int Resilience { get; set; }
    }

    public EquipmentStat EquipmentConfiguration { get; private set; }

    public void AddConfiguration(EquipmentStat equipmentConfiguration)
    {
        EquipmentConfiguration = equipmentConfiguration;

        // Now you can access
        // EquipmentConfiguration.Defense
        // or EquipmentConfiguration.Resilience
    }
}
When instantiating numerous GameObjects repeatedly, I strongly recommend using a Pooling system.
This system allows you to reuse previously created GameObjects instead of creating new ones.
Instantiating and destroying GameObjects can be costly.
Additional Tip: In an editor context, if you find yourself instantiating GameObjects, don’t forget to call the EditorUtility.SetDirty method on your GameObject.
Otherwise, the scene won’t recognize that there are new changes, and no matter how many times you press Ctrl+S, nothing will be saved.
Throughout this exploration, we’ve delved into various aspects of the Instantiate method, from its basic usage in duplicating game objects to more advanced scenarios such as instantiating prefabs, scriptable objects, and handling multiple scenes.
We’ve also uncovered techniques like instantiating as a child, setting positions and rotations, and creating empty game objects.
Thanks for reading. Happy coding !
Original image by Freepik